

In this illustrated guide, we’ll go through the process of using a Japan Rail Pass (JR Pass) to make free seat reservations on a ticket machine.
Overview
Since 2020, JR Passes have been issued as standard-sized tickets on magnetic cardboard stock, measuring 8.5 cm x 5.7 cm. This is in contrast to the form many travellers are familiar with from the pre-pandemic era: a printed ticket glued to a passport-sized booklet that could only be used at manned station gates and manned ticket counters.
That’s all changed now. The new format allows JR Pass users to go through automated station turnstiles, and it also gives them the ability to make seat reservations at ticket machines.
Even after this change, a JR Pass user still has the option to make seat reservations at a ticket office (including ticket counters, midori-no-madoguchi, JR travel service centres and other manned facilities). This alternative might be preferable for those who are unfamiliar with the rail system and require extra guidance, or those who might wish to make several advance reservations in one go. However, the convenience of using ticket machines cannot be underestimated, especially in view of the long queues that one encounters at ticket offices during peak times.
The following image shows the key elements of the current-generation Japan Rail Pass. For use at ticket machines, the essential feature is the QR code on the lower left section of the card (redacted in this example).

If you plan to bring oversized luggage on board – which is subject to special rules introduced in 2020 – please use this present guide in conjunction with my separate article describing how to reserve seats with extra luggage space.
For more details about the JR Pass in general, you can refer to the official Japan Rail Pass website and the related Japan Rail Pass Reservation portal. This PDF copy of an official leaflet sets out key information that pass users should be aware of.
Step-by-step guide
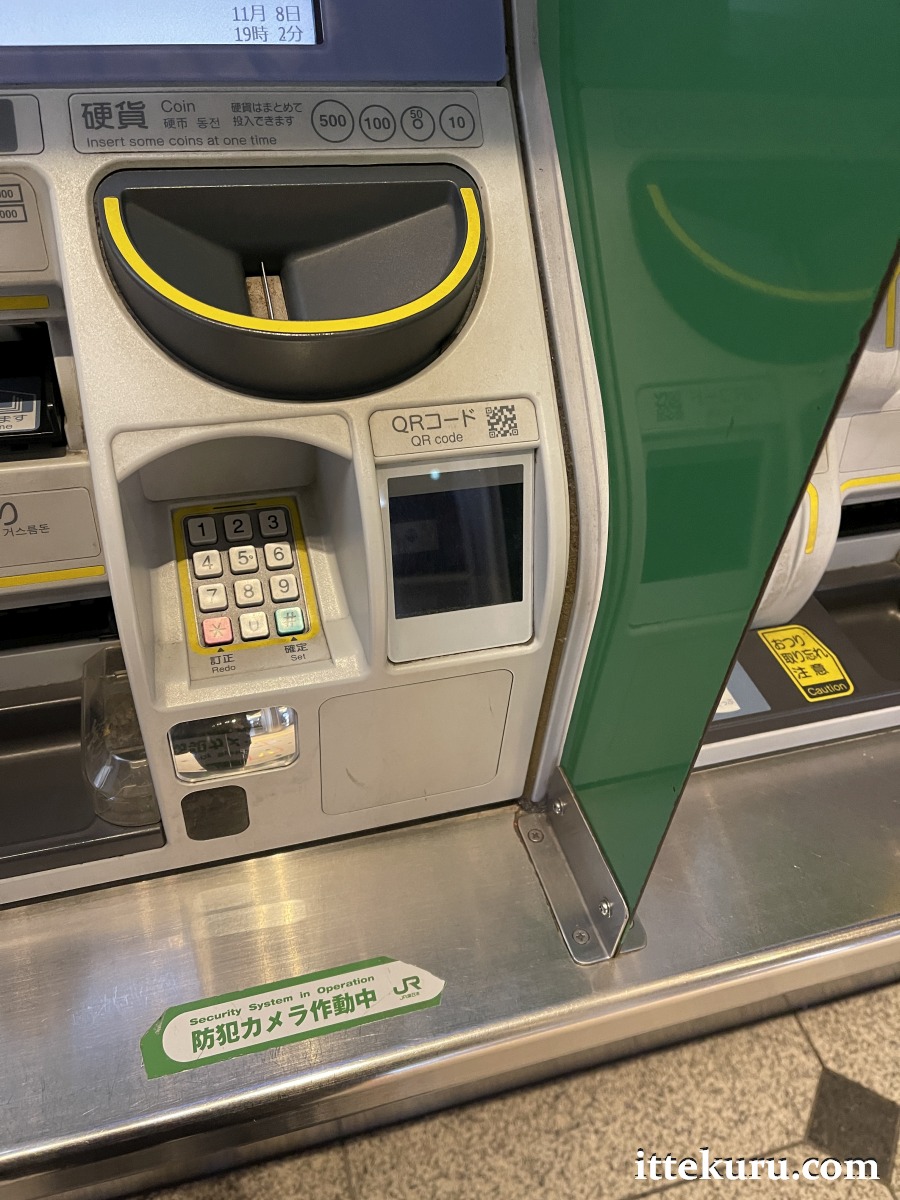
1.) Look for a ticket machine fitted with a QR code reader.
Many – but not all! – ticket machines at JR stations are equipped with QR code readers. Look for a small pane of glass labelled “QRコード” in Japanese and “QR code” in English (see pictures below). This piece of equipment is absolutely essential: you can’t use a JR Pass at a ticket machine that doesn’t have one of these.
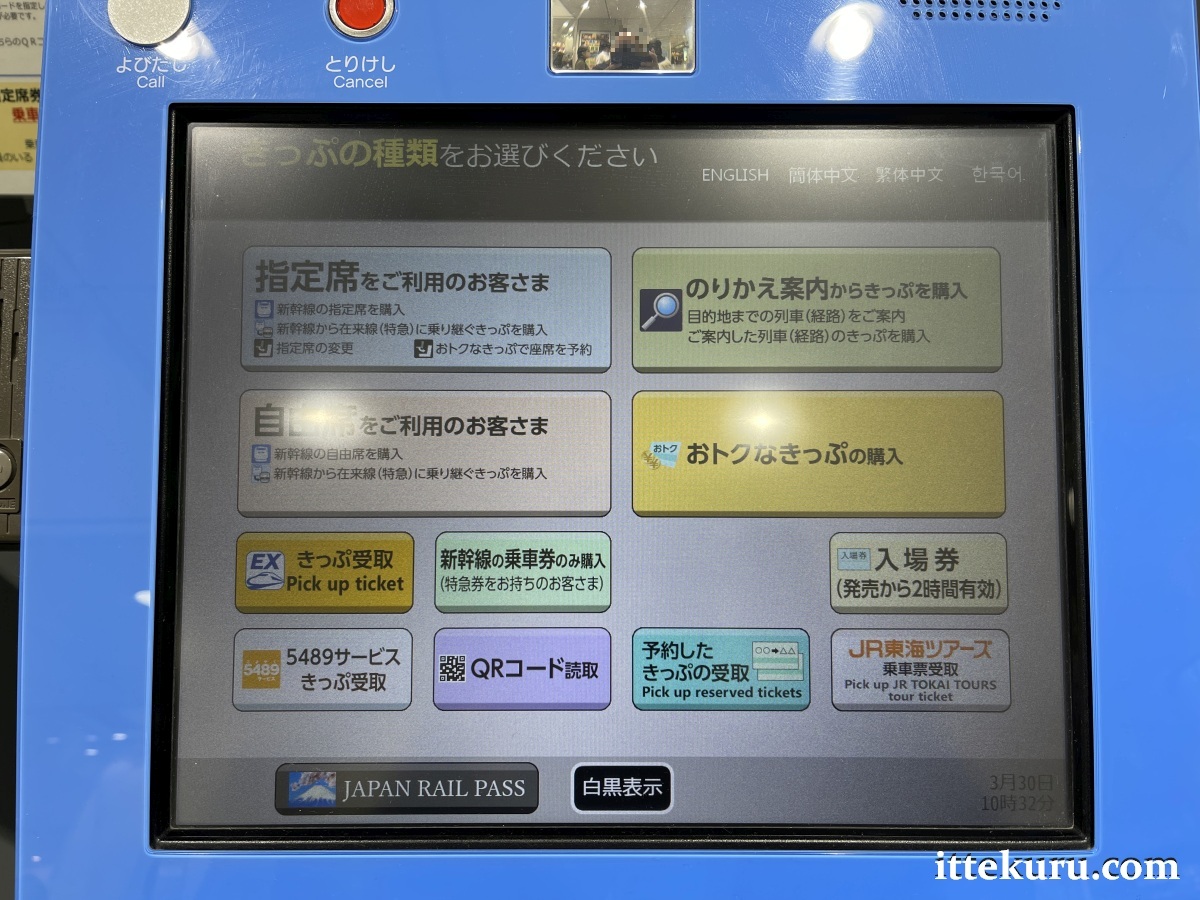
Whilst on the home page, you can change the interface language to English, Simplified Chinese, Traditional Chinese or Korean by tapping on the corresponding button (upper right-hand corner of the touch screen).
Tap on the bar labelled “JAPAN RAIL PASS” (bottom row of the touch screen) to begin the reservation process. If you haven’t already changed the interface language, you’ll be prompted to do so at this point.
The next two pictures show a common type of ticket machine that you’ll see in many JR stations. The QR code reader is on the lower right-hand portion of the device.

The three pictures that follow are of a different ticket machine variant that you can also use with a JR Pass.


Note that the QR code reader on this model is towards the left, below the touch-screen interface.
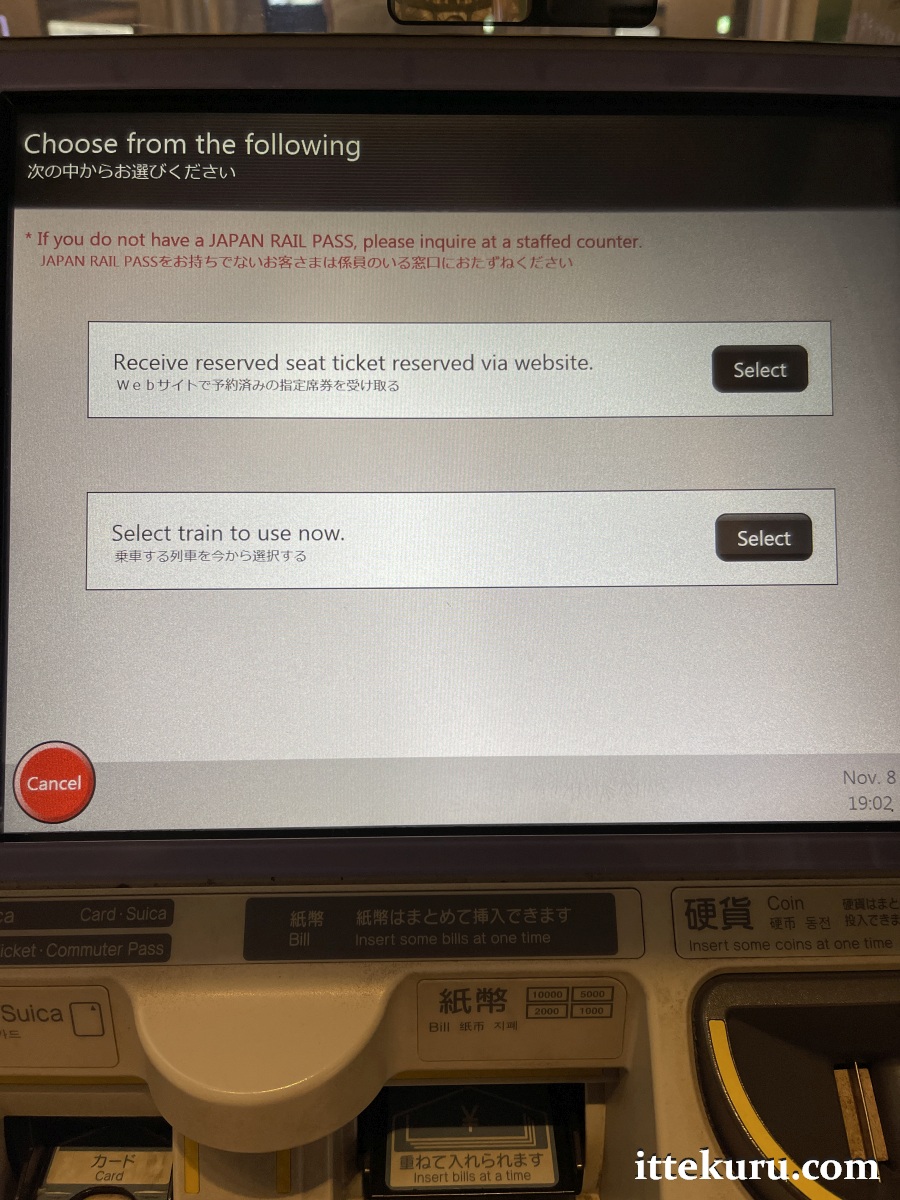
2.) Tap on the “Select” button next to “Select train to use now”.
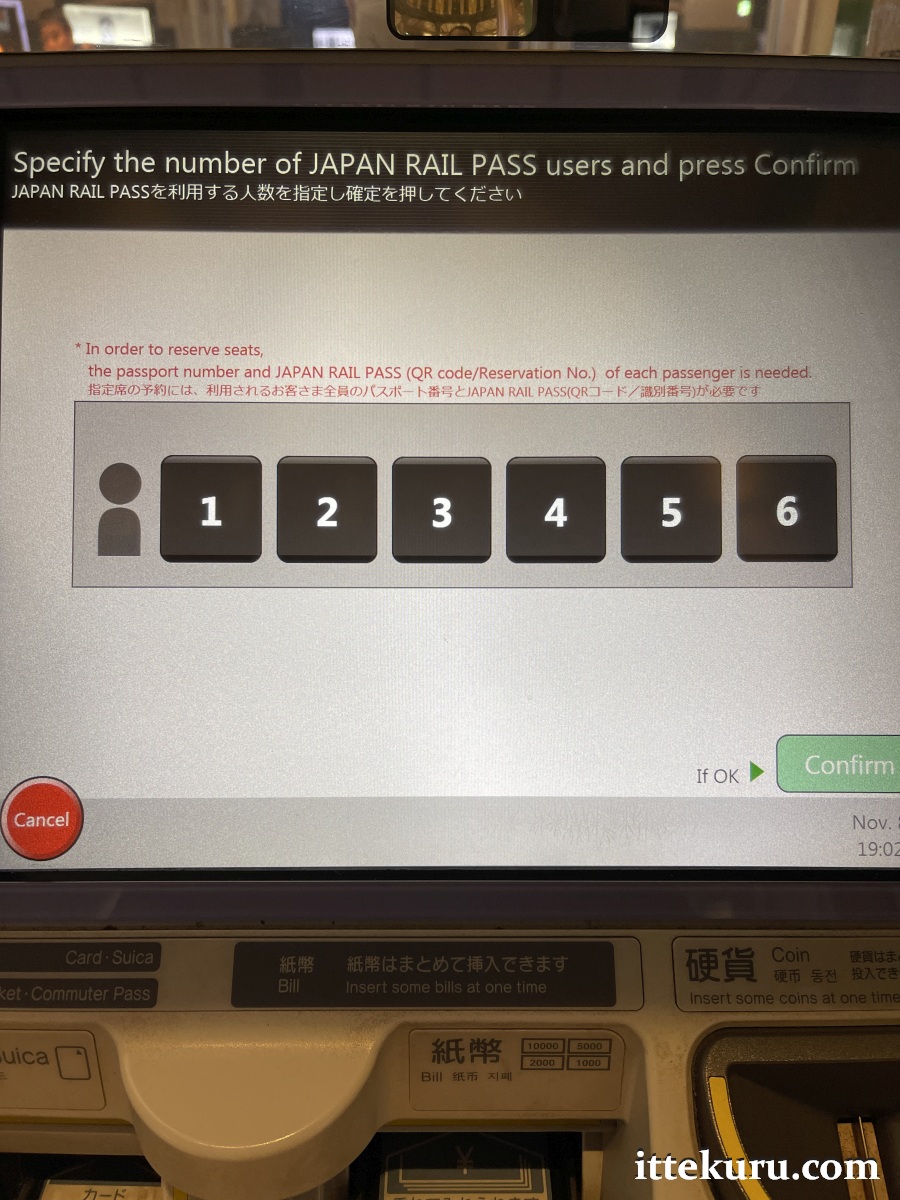
3.) Tap on the number of JR Passes you’d like to make reservations for, then tap on the “Confirm” button.
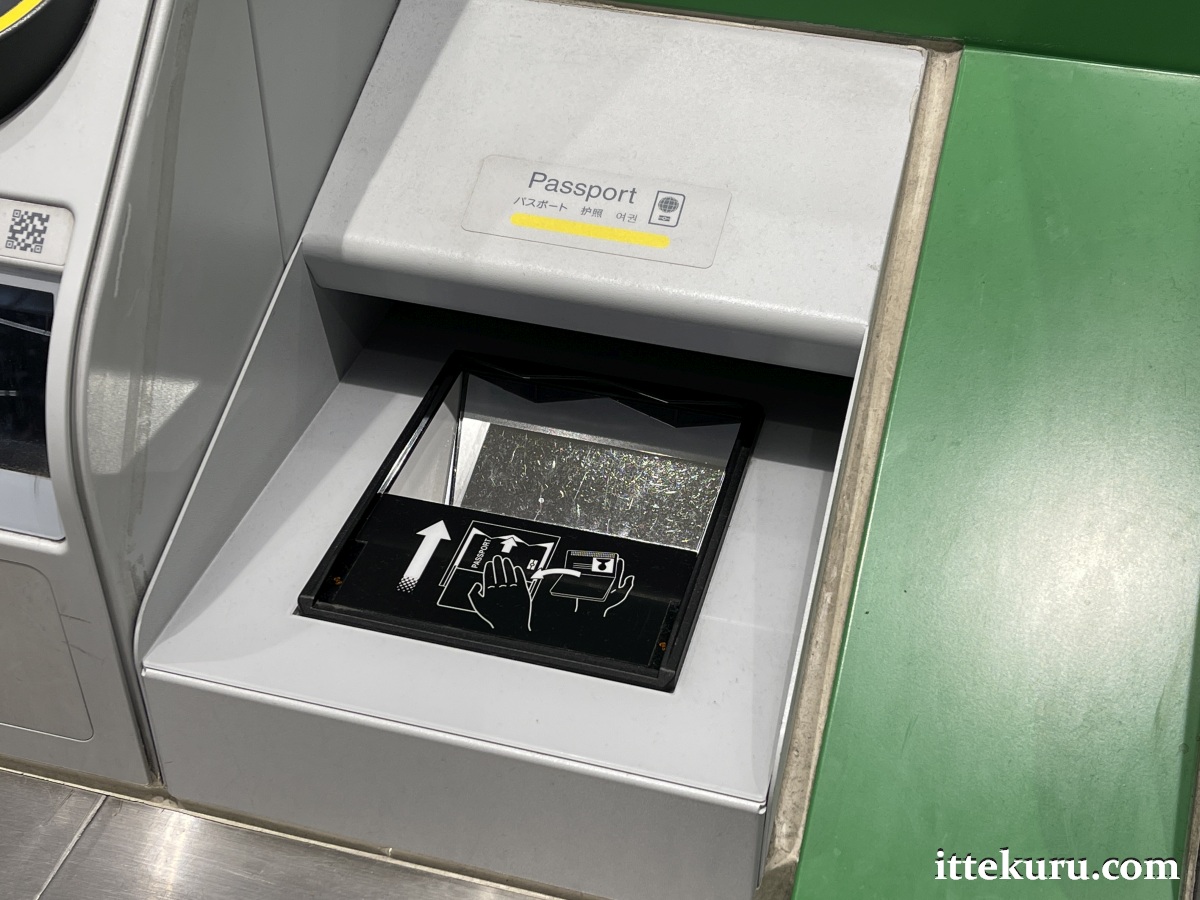
4.) Hold the QR code of your JR Pass up against the face of the reader to scan it.
5.) Enter your passport number, then tap on the “Confirm” button.
Note that the orange “Correct” button next to the passport number field is equivalent to a backspace key; i.e., it will delete the characters you’ve entered one by one.

A small number of ticket machines at select stations – such as those listed on this JR East pamphlet – are fitted with passport readers. If the machine you’re using has one of these, you’ll be given the option to either enter your passport number manually OR scan your passport’s information page so that the machine can pick up the number for you.
6.) If you’re making reservations for more than one JR Pass, repeat steps 4 and 5 for each of the passes.
To limit crowding at ticket machines, one person can make all the reservations for their party whilst their companions wait elsewhere. The representative will need to bring all the JR Pass cards (which must be scanned individually) and they’ll also need to know the passport number linked to each one (which must be entered after each QR code is scanned).
7.) Enter the details of your journey, then tap on the “Search” button.
Tapping the blue “Enter” button next to each field will bring up a page where you can key in the necessary details.

8.) Choose your preferred train/schedule from the options presented.
The icons in each column represent seat availability. A green circle means that there are still many vacant seats available; a yellow-orange triangle indicates that there are only a few seats remaining.
As for the column headings, “Ordinary Car” means economy class, whilst the green clover leaf icon stands for the first-class “Green Car”.
You can tap on the “Next” button (right edge of the touch screen) to display more results. Once you’ve made a choice, tap on the green “Select” button below your preferred option to proceed.

9.) Select the type of car you’d like to use.
If you have an Ordinary JR Pass, the only available option will be “Ordinary car” (economy class). If you have a more expensive Green JR Pass, the machine will allow you to select either “Ordinary car” or “Green car” (first class). Tap on the black button corresponding to your chosen class of travel.
As on the previous screen, the icon within each button (circle or triangle) signifies seat availability.

If you’re booking a journey on the Tōkaidō Shinkansen (run by JR Central), the San’yō Shinkansen (run by JR West), and the Kyūshū/Nishi-Kyūshū Shinkansen (run by JR Kyūshū), you’ll see an extra notice advising that the selected train has seats with oversized luggage space. Tap “Confirm” (lower right-hand corner of the touch screen) to proceed.

If you’re not travelling with oversized luggage, tap on the “Ordinary seat” button and continue from Step 10 below.

On the other hand, if you are travelling with oversized luggage, tap on the “Seat with oversized baggage area” button. Refer to my separate guide for booking seats with extra luggage space to see how the process will continue from there.
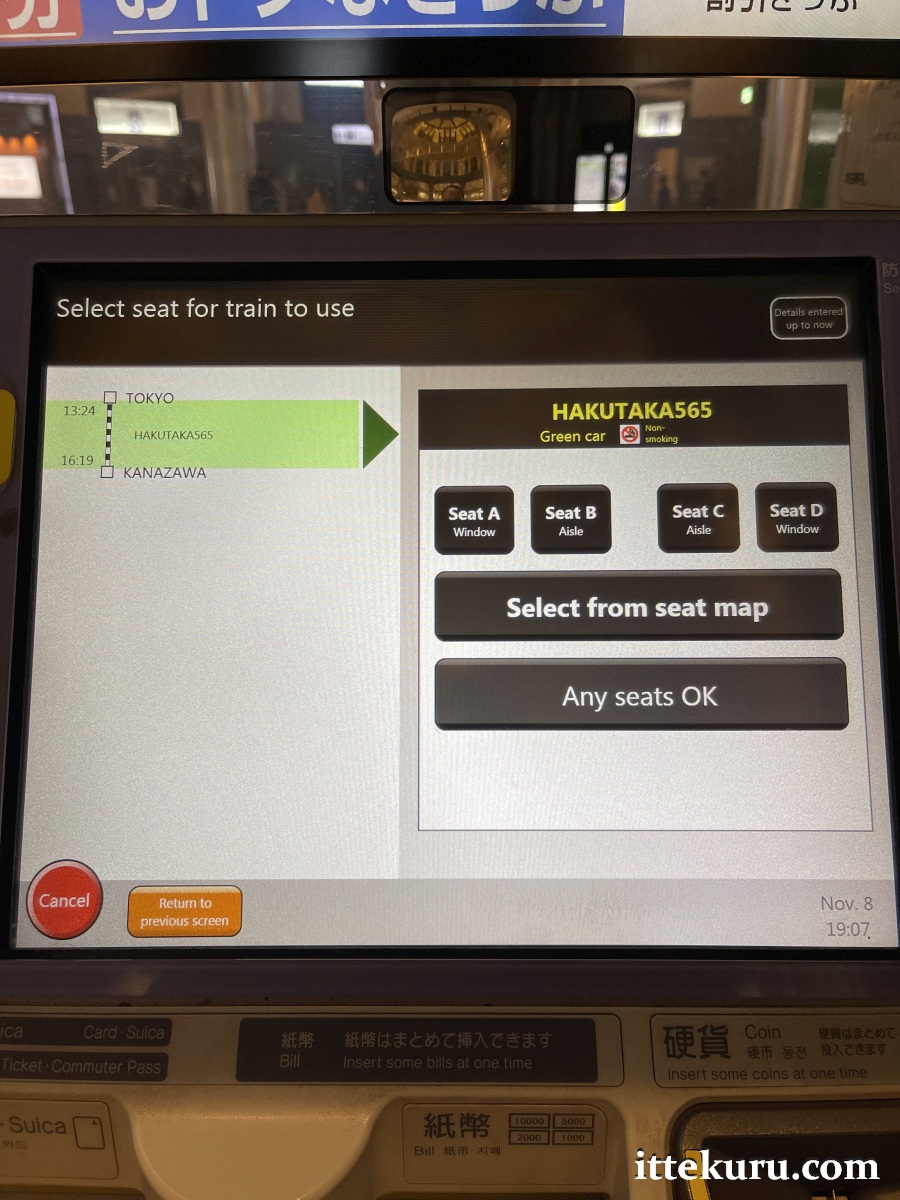
10.) Choose your preferred seat position.
If you’d like to choose a specific seat in a particular car – which is our assumption for the rest of this guide – tap on the “Select from seat map” button.
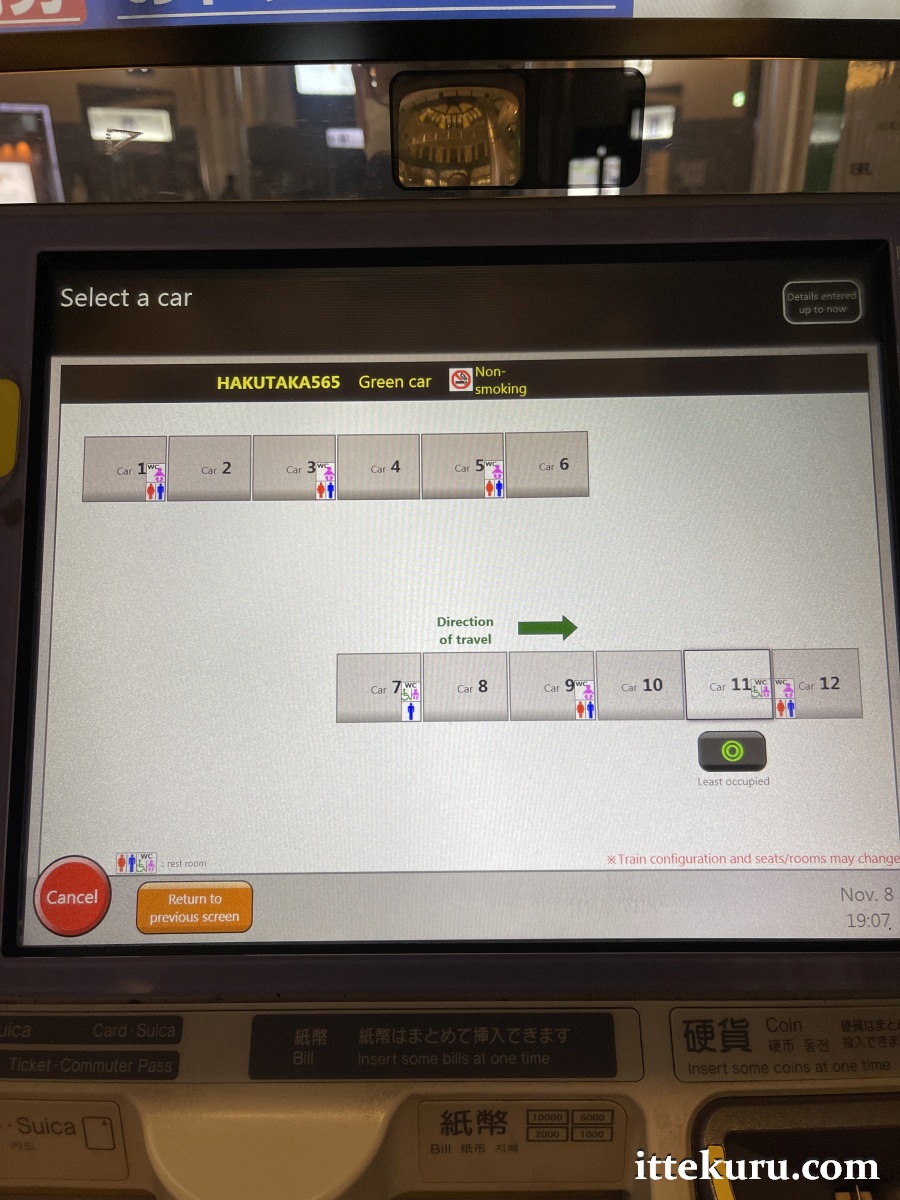
11.) Select your desired car.
Based on seat availability and your chosen class of travel, one or more cars will be available for you to choose from. A black button (like the one beneath Car 11 in the picture below) will appear next to each car that can be selected. Tap on the button corresponding to your chosen car.
12.) Tap on the button corresponding to your preferred seat.
Vacant/available seats are marked with black buttons. Greyed-out seats are occupied/unavailable.
If you’re making reservations for more than one JR Pass, you’ll be able to choose multiple seats at this stage.

13.) Do a final check of your journey/seat details on the confirmation page.
This is your last opportunity to backtrack and make changes/corrections before the ticket is issued, so make sure everything is in order before proceeding.

Tap on the green “Confirm” button to finalise your booking.
14.) Collect your seat reservation ticket/s from the printer slot.

And that’s all there is to it.
Just bear in mind that you cannot pass through station gates or board trains with seat reservation tickets alone. You need to insert the actual JR Pass card into the turnstiles (remember to retrieve it when it pops up on the other side!) to access the platforms and to exit at the end of your journey.
Safe and happy travels, everyone.
Useful Links
The main Japan Rail Pass website. This and the reservation site below are the ONLY official websites for the Japan Rail Pass. All other sites – even those managed by JR-authorised agents – are technically third-party resources and the information published on them (whilst potentially helpful) carries no official weight.
https://www.japanrailpass-reservation.net/
The ONLY site through which you can purchase the Japan Rail Pass directly from the JR Group. Only travellers purchasing their passes through this official site are entitled to make online seat reservations. Passes purchased from any other vendor, even from JR-designated third-party agents, cannot be used to book train journeys via the internet. Note that a JR Pass purchased from any source, whether official or third-party, can be used to reserve seats using ticket machines once the actual pass card has been issued after your arrival in Japan.
https://www.japan-guide.com/e/e2361.html
A detailed overview of the Japan Rail Pass on the Japan-Guide tourism website.
Like what you’re reading? Buy me a coffee!


Does not match the broken JR east hokaido rail pass which has no QR code
Unfortunately, this guide covers only the JR Pass – i.e., the nationwide rail pass accepted for passenger transport by all JR Group companies. The various regional rail passes (such as the Hokkaidō Rail Pass) are not covered by the term “JR Pass” if it’s used without qualification. They’ll have their own rules as to validity and use; for example, passes issued by JR East have no QR code and must be fully inserted into the ticket machine when making reservations.